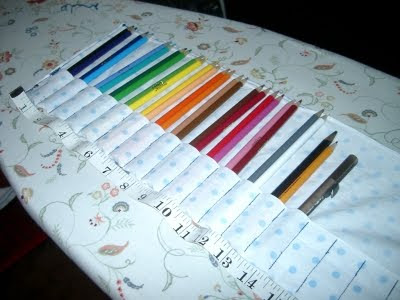
Pencil Holder
Pencil Holder
This Instructable will describe how to create a roll-up pencil-holder made of fabric.
I wanted to go to the park and sketch wildflowers.
Simple desire, easy goal.
It was a nice day, my day off work.
I like wildflowers.
First, however, I needed a way to carry my set of colored artist pencils. I wanted it portable and simple, something like one of those roll-up tool kits, with a pocket for each wrench. I wanted a roll-up pencil kit, with a pocket for each pencil.
Here's what I did.
Step 1: Cut fabric
I cut a piece of fabric, 10-1/2 inches wide, by 41 inches long. I tried to be accurate, using a rotary cutter and cutting mat, with a 36-inch straightedge.
Step 2: Hem all edges
I folded each edge twice, 1/4-inch for each fold. After each fold I pressed it flat with a hot iron. This type of hem completely encloses the raveled edge of the fabric.
After pressing the hems flat, I used a sewing machine to straight-stitch down the length of each hemmed edge.
After hemming all edges, the piece measured about 9-1/2 inches by 40 inches.
Note: It's possible that you'll catch me in a lie. The piece of fabric that I found in my wife's scrapbox already had one edge that did not need hemming...it had a selvage, an edge that was self-finished from the factory. My instructions here assume that you'll need to hem all four edges.
Step 3: Form pocket section
I folded one long edge up about 2-1/2 inches, pinned it in place, and ironed it flat. This long fold will form the section in which I would soon sew one-inch pockets.
I chose a 2-1/2 inch fold as a compromise...I really should have chosen a wider piece to start with. The longest pencil I found was about 7-inches long. the 2-1/2inch fold provided an adequate size for a pocket to hold the pencil, and the remaining 7-inches of fabric would just barely cover the tips of the pencils.
Were I to make another pencil holder, I think I would make the width a total of 5-inches more than the length of my longest pencil. This would provide a 2-1/2" flap that I could loosely fold over the pencils prior to rolling them up, protecting a securing the pencils better.
Oh, well.
Step 4: Sew both ends
I sewed the long fold at both ends, reinforcing all corners with an inch or so of heavy zig-zag stitching.
Step 5: Sew pockets
I created one-inch wide pockets down the entire length of the long 2-1/2" folded edge. One-inch wide pockets allow two pencils to be placed in each pocket, or one jumbo pencil per pocket.
After the first dozen pockets, I finally realized that a strip of tape, marked at one-inch intervals, would make the process easier!
If you're new to sewing, don't be alarmed or confused by the photograph showing lazy diagonal thread lines from one pocket to the next. Rather than clipping the thread after each pocket, I just raised the foot of the sewing maching, moved to the next pocket, and continued sewing. The loose threads will be snipped away after all the pockets are sewn.
Again, were I to make another, I think I would make the pockets a bit more narrow. My pencils seem to be quite loose, even with two per pocket. Maybe 1/2-inch pockets?
My pocket-holder turned out to be plenty long. I'd recommend that you consider making it only 24-inches long. I still might cut mine shorter and re-hem it. Shouldn't be hard to do.
Step 6: Finished!
I clipped all loose threads, placed pencils in the pockets, admired my work, and rolled it up for a trek to the park. Come sketch some wildflowers with me!

This work is licensed under a Creative Commons Attribution 3.0 Unported License.


Good JOB!!! Now you can make a quilt , too!! Seriously, if you know how to use a sewing machine , I have tons of " easy" quilt patterns that you could do no problem!! HAHA, you are just the man of many talents, dear friend!
ReplyDeletekaren
Thank you, Karen! Your praise means a lot to me. You are the Queen of Quilting in my book!
ReplyDeleteNext step, add ribbons to tie closed or velcro. I had no idea you were so crafty...a man of many talents.
ReplyDeleteJann
Jann, great idea! I'll work on it!
ReplyDelete