Windows Live Office Web Applications Tutorial
Windows Live Office Web Applications Tutorial
Microsoft provides a free (for personal use only) suite of online applications that are easy to use and accessible on any computer online.
This tutorial will help you get started using the PowerPoint application.
Step 1: Obtain Windows Live ID
Visit this site to register for a free username and password for your Windows Live account:

The registration screen will require basic information:

Step 2: Sign in
After you confirm your email address, your account will be activated. Re-visit the home page and sign in with your Windows Live ID:

Windows Live will open with a screen showing several links available to you.

Step 3: Open Office
In the upper left-hand corner, hover your cursor over "Windows Life". Select "All services in the drop-down menu.

Windows Live provides you access to dozens of free services.
For now, select "Office".

Click on the menu item, "New", and select "PowerPoint presentation".

Step 4: Enter the title
Enter a title for your presentation. Notice that the file will be saved in "pptx" format. This is a "read-only" version of PowerPoint. It can be edited only online or with a desktop version of PowerPoint. A PPTX file can be opened by anyone, but edited only by someone using a genuine, desktop version of PowerPoint.
After saving your PPTX file, you'll be able to download it to your computer, print it, or share it online with anyone.
After entering a title for your presentation, click "Save".
Step 5: Create your presentation
Select a theme for your presentation.

Your first slide will have a title layout.
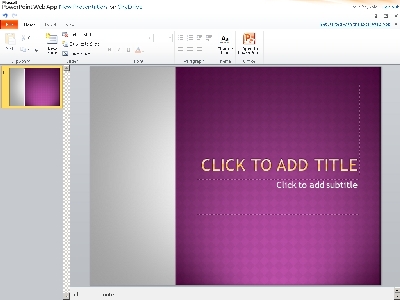
You'll need to click TWICE on "Click To Add Title". If you only click once, here's how it will respond:

Strangely, the cursor will vanish, and nothing you type will appear.
So, you'll need to click TWICE to enter the title or text. If you click TWICE, the cursor will appear, and anything you type will show up.

Click on the menu item, "File", and the drop-down list will reveal ten different items. Notice that there is no "Save" option. This online version of PowerPoint automatically saves every slide, every change, every time. Nice!
For now, select "Share".

Step 6: Share your file
You can select the level of sharing you desire, and even enter someone's email address. They will receive an email message with a direct link to your file. Nice!

Step 7: Options
Look back at the File options:

You can print the presentation, change properties, give feedback to Microsoft about what you think, change your privacy settings, and more.
Step 8: Close your file
For now, select "Close".
You can see your new document listed. Hover your cursor over your new presentation, click on "More", and select "Download".

Select the location on your computer to which you wish to download and save your presentation. It is not necessary to download your files. Microsoft keeps a copy of your documents available anytime, from any computer online, in your Windows Live account. But it is nice to be able to download a copy of the file.
The downloaded file will be view-only. If you own a desktop version of PowerPoint, you'll be able to open and edit the presentation. But otherwise, you'll only be able to view the presentation.
Microsoft provides a free desktop version of a PowerPoint viewer. It allows you to open and view any version of PowerPoint. It will NOT allow you to edit or make changes. The desktop viewer is nice to have because it doesn't require an internet connection to use.
You can download the free viewer here:
http://www.microsoft.com/download
That's it! I'm looking forward to learning more about using Windows Web Applications. How about you?

This work is licensed under a Creative Commons Attribution 3.0 Unported License.


Comments
Post a Comment